If charging does not start despite following the proper procedure, it is essential to verify all system indicators and settings. Begin by reviewing any messages that appear on the multi-information display, as these alerts can offer valuable clues about the underlying issue.
When charging fails to initiate, consult the troubleshooting table below. This table outlines common error messages along with their corresponding corrective actions. By following these clear instructions, you can quickly address the problem and restore your charging functionality.
Employing a systematic approach to troubleshooting not only accelerates the diagnosis process but also helps maintain the overall health of your vehicle’s battery system. Intelligent diagnostic systems built into modern electric vehicles are designed to communicate issues directly on the display, allowing you to take prompt action.
For example, advanced electric vehicles, such as the Toyota bZ4X, utilize smart monitoring that continuously checks the system status and guides you through any necessary corrective procedures. This detailed feedback ensures that any interruption in charging is addressed quickly, reducing downtime and enhancing battery longevity.
By carefully examining the messages on the multi-information display and following the recommended procedures from the troubleshooting table, you can effectively resolve charging issues and ensure a reliable, efficient charging experience.
Troubleshooting Common Charging Issues
When your charging process fails to start, it can be both frustrating and worrisome. To help you resolve these issues effectively, follow the steps outlined below. These checks not only ensure a secure connection but also safeguard against potential damage to your equipment, ensuring that your recharging experience remains safe and uninterrupted.
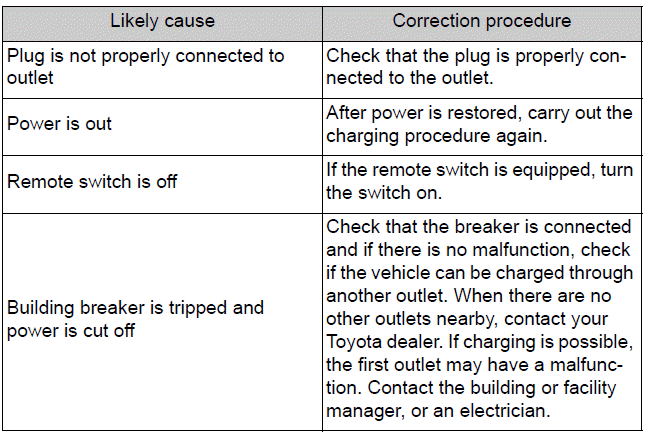
1. Confirm Plug Connection
A secure plug connection is essential for proper charging. If the plug is not firmly connected to the outlet, the charging process will not initiate. Always double-check that the plug is fully inserted. A loose or partial connection can disrupt the power flow, leading to incomplete charging or system errors.
2. Verify Power Supply
If a power outage occurs, the charging process will be halted. Once power is restored, restart the charging procedure. Occasionally, fluctuations in the electrical supply can cause temporary interruptions, so re-initiating the process immediately after power returns is a crucial step.
3. Check Remote Switch Settings
For systems equipped with a remote switch, make sure that the switch is turned on. An inactive remote switch can disconnect the charging input despite all other components being in proper order. Ensuring this switch is enabled is a key step in troubleshooting.
4. Inspect the Building Breaker
A tripped building breaker may result in a complete power cutoff. Verify that the breaker is properly engaged and, if necessary, reset it. If your surroundings offer another outlet, try recharging through it; a successful charge on an alternate outlet might indicate a malfunction in the original outlet. At this point, contacting the building manager, a facility supervisor, or a qualified electrician may be necessary to resolve persistent electrical issues.
If none of these corrective actions restore the charging functionality, the AC charging cable or plug-cord itself could be damaged. Continuing to use a compromised cable poses safety risks and may lead to further damage. In such cases, promptly cease charging and seek professional assistance by contacting your Toyota dealer.
Implementing these troubleshooting measures not only minimizes downtime but also contributes to a safer and more energy-efficient charging routine. Maintaining a healthy charging system is paramount for reliable performance and long-term durability. Advanced charging systems in modern electric vehicles, such as the Toyota bZ4X, exemplify how integrated safety protocols and smart diagnostics can ensure a seamless charging experience.
By adhering to these guidelines and performing regular checks, you ensure that your charging setup stays in optimal condition, enhancing both efficiency and safety. Adopting a proactive approach to troubleshooting helps safeguard your investment, reduces energy costs, and supports a sustainable future for electric mobility.
Troubleshooting a Flashing CCID Error Indicator
If you notice that the error warning indicator on the Charging Circuit Interrupting Device (CCID) is flashing during your charging process, it is a clear sign that the system’s built-in safety protocols have been activated. This alert indicates that power may have been cut off due to a detected anomaly in the charging circuit.
Likely Cause: One common reason for this flashing warning is the operation of the electrical leakage detection or self-diagnostic function within the charging system. Insufficient voltage-often influenced by noise interference-can trigger these safeguards, leading the system to interrupt the charging process to prevent any potential hazards.
Correction Procedure: To resolve this issue, begin by performing a complete system reset. Ensure that the vehicle is connected to a proper, stable power source that meets the required voltage specifications. This step is crucial for eliminating any temporary disturbances caused by electrical noise. If, after the reset, the charging does not commence as expected, immediately stop the charging process to avoid further complications.
For your safety, do not attempt to reinitiate charging until you have connected to the correct power source and ensured that all parameters are within the normal operating range. Persistent issues may necessitate professional assistance; if the error indicator continues to flash, contact your authorized service center. Advanced electric vehicles-such as the Toyota bZ4X-integrate these robust safety measures to protect both the charging system and the vehicle’s overall performance.
 Using My Room Mode
 Troubleshooting Charging Issues: A Comprehensive Guide
Replacing the Tire
Before attempting to replace a tire yourself, it is crucial to prepare all the necessary tools and a suitable jack. This vehicle uses wheel bolts, and when using wheels installed at the factory, you must use specialized Toyota Genuine wheel bolts to ensure a secure fit and proper performance. If ...
Understanding and Adjusting Your 2025 Toyota bZ4X Climate Control System
Modifying the Temperature Settings
To adjust the temperature inside your 2025 Toyota bZ4X, locate the temperature control switch on the climate control panel. Gently push the switch upwards to increase the set temperature for a warmer cabin, or downwards to decrease it for a cooler environment.
It ...
