The charging schedule function gives you complete control over when your AC charging sessions begin, allowing you to take advantage of off-peak energy rates and optimize battery health. With this feature, planning your charging routine becomes as convenient as setting an appointment in your calendar.
Key Aspects of the Charging Schedule Function
When the charging mode is set to "Start-Stop" and both the start and stop times are identical, the system will interpret this as a command to charge continuously for 24 hours from the designated start time. Note that this charging schedule feature is reserved exclusively for AC charging – it is not available for DC charging.
Ensuring Proper Operation of Your Charging Schedule
To make sure the charging schedule function works correctly, check the following details:
The charging start time is determined at the moment the AC charging connector is inserted. To ensure proper charging, always connect the AC charging connector before the scheduled start time. If you use the "Start" mode and connect after the set start time, the system will simply reference the next scheduled event.
With "Start-Stop" mode, if you connect the AC connector after the scheduled start time, charging will commence immediately and continue until the programmed stop time is reached.
Using an outlet that consistently supplies power is essential. If the outlet’s power is interrupted by its own scheduling or cutoff features, your charging session may not run smoothly, potentially compromising your battery's performance.
Adopting a smart charging schedule not only helps in reducing energy costs and ensuring your battery is kept in optimal condition, but it also enhances overall convenience in your daily routine. Modern electric vehicles, such as the Toyota bZ4X, demonstrate the importance of smart charging technology by integrating advanced scheduling capabilities that support efficient, reliable, and eco-friendly driving.
By meticulously planning your AC charging sessions through the charging schedule function, you pave the way for improved battery longevity, reduced electricity expenses, and a more sustainable approach to energy consumption. This thoughtful and proactive method is a game changer for electric vehicle owners who value both convenience and performance.
When the AC Charging Connector Remains Connected to the Vehicle
When the charging mode is set to "Start," even if you have registered multiple consecutive charging schedules, the next charging cycle will not commence until you disconnect and then reconnect the AC charging connector after the previous session is complete. In addition, once the traction battery has reached full capacity, the scheduled charging will be suspended.
In contrast, if you are using the "Start-Stop" mode and the stop time is reached before the battery is fully charged, the system automatically updates the next charging schedule based on the nearest available slot after the designated stop time. In this case, charging will resume according to the updated schedule until the battery is completely replenished.
For extra convenience, you can use the Toyota App on your smartphone to modify and manage your charging schedule settings remotely. This smart application empowers you to tailor your charging times according to your daily routine, take advantage of off-peak electricity rates, and ensure optimal battery performance.
Optimizing your charging schedule not only enhances efficiency and battery longevity but also supports a more sustainable approach to energy consumption. By leveraging such advanced scheduling features, you can seamlessly integrate electric vehicle charging into your lifestyle while reducing operating costs and environmental impact.
When Charging Schedules Are Ignored
Certain operations, when executed while the charging schedule is on standby, will automatically cancel the preset schedule and trigger immediate charging. This intelligent override is designed to prioritize real-time needs and enhance overall user convenience.
This adaptive functionality ensures that if your needs change suddenly-for example, if you require immediate climate control or an unexpected power boost-the charging system responds promptly, bypassing the pre-programmed schedule. Such seamless transitions not only optimize battery management but also significantly reduce downtime by ensuring that your vehicle is always ready for action.
Moreover, integrating these smart override features supports efficient energy use and extends battery longevity by dynamically balancing scheduled routines with on-demand charging. Modern smart charging solutions, as exemplified by the Toyota bZ4X, combine technological innovation with user-centered design to deliver an eco-friendly and highly responsive electric mobility experience.
Battery Heater / Battery Cooler
When the traction battery’s temperature strays from the optimal range, the built-in thermal management system takes action by engaging the battery heater or the battery cooler. In cold conditions, the battery heater activates to gently warm the cells, improving charging efficiency and performance. Conversely, when temperatures climb too high, the battery cooler kicks in to lower the battery’s temperature, protecting the cells from thermal stress and degradation.
During periods when the charging schedule is waiting to commence, you might notice that the charging indicator lights up. This serves as a sign that the system is actively regulating the battery’s temperature-ensuring that the battery reaches the ideal state for safe and effective charging.
Advanced electric vehicles benefit greatly from this intelligent temperature control. For example, the Toyota bZ4X seamlessly integrates such thermal management features to maintain battery life and stable performance regardless of environmental fluctuations.
By automatically adjusting between heating and cooling modes based on real-time temperature readings, the system not only maximizes the efficiency of each charging cycle but also extends the overall lifespan of the battery. This dynamic control is a key element in reducing long-term maintenance costs and ensuring that the vehicle operates safely and reliably, even under extreme weather conditions.
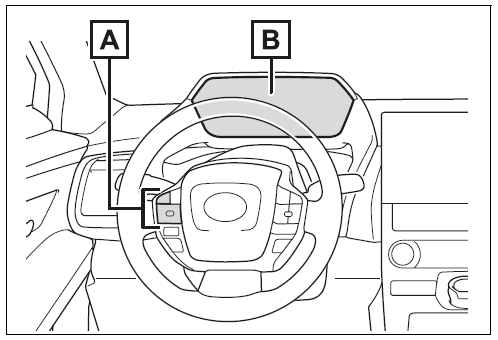
Setting operations on multi-information display
When operating charging schedule, use the meter control switches.
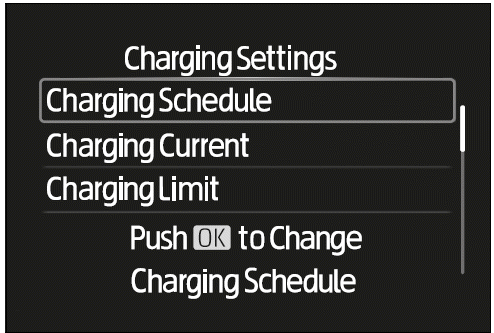
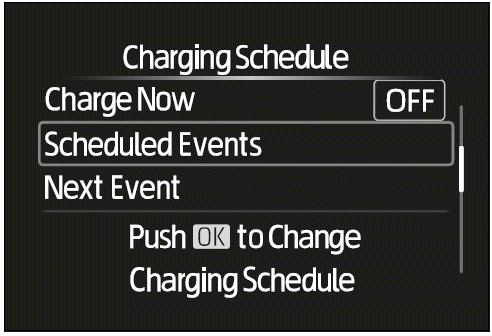
Display the "Charging Schedule" screen
 or
or
 of the meter
control switches to select
of the meter
control switches to select  .
.
 or
or
 of the meter
control switches to select
"Vehicle Settings", and then
press and hold
of the meter
control switches to select
"Vehicle Settings", and then
press and hold  .
.
 or
or
 of the meter
control switches to select "Charging Schedule", and
then press .
of the meter
control switches to select "Charging Schedule", and
then press .
The "Charging Schedule" screen will be displayed.
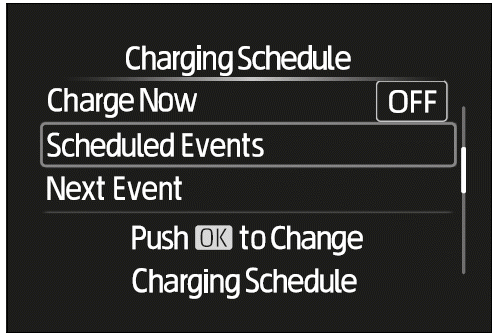
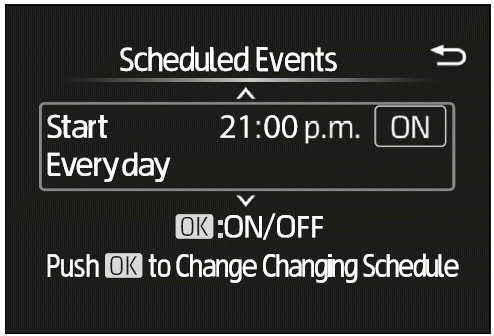
Registering the charging schedule
 or
or
 of the meter
control switches to select
"Scheduled Events", and
then press
of the meter
control switches to select
"Scheduled Events", and
then press  .
.
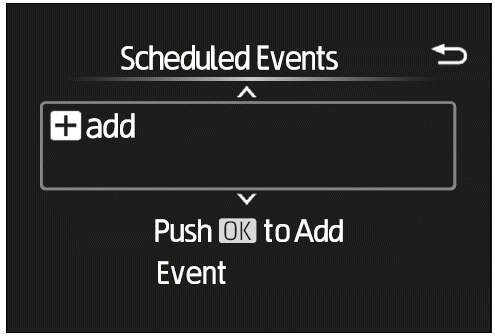
The "Scheduled Events" screen will be displayed.
 or
or
 of the meter
control switches to select
"+add", and then press .
of the meter
control switches to select
"+add", and then press .
The "Charging Mode" screen will be displayed.
 or
or
 of the meter
control switches to select the
item to change with the cursor,
and then press
of the meter
control switches to select the
item to change with the cursor,
and then press  or
or
 to change the setting, Select
the charging mode, and then
press
to change the setting, Select
the charging mode, and then
press  .
.
Set the time that is desired to start the charging when charging mode is "Start" Set the time that is desired to start and completion time when charging mode is "Start-Stop".
.If you selected the charging mode "Start-Stop" in step 4, continue to set the stop time.
 or
or of the meter
control switches to select the
desired day to activate for the
repeated setting, and then
press .
of the meter
control switches to select the
desired day to activate for the
repeated setting, and then
press .Each time is pressed, the
repeated setting switches
between on and off.
When set to on, the charging schedule is repeated on that day. It is possible to set more than one day to on.
When setting are complete, select
"Done", and then press .
A screen where the settings can be saved will be displayed.
.The settings will be saved.
After setting operations are complete, when the AC charging connector is connected to the vehicle, charging will be carried out according to the charging schedule settings.
Switching charging schedules between on and off
Switching charging schedules between on and off
.A list of the registered charging schedule will be displayed.
.Each time is pressed, the
selected charging schedule
switches between on and off.
When set to off, a charging schedule is ignored and charging according to the charging schedule is not carried out.
Changing the registered charging schedules
The registered charging schedules can be modified or deleted.
 .
.The "Scheduled Events" screen will be displayed on the screen.
Select the contents are desired to
be changed, press and hold the  and then select "Edit".
Change the desired settings as described starting from step 4 of the "Registering the charging schedule" procedure.
Select "Save" and press to
save the settings.
Select the contents are desired to
be changed, press and hold the
and then select "Delete".
A deletion confirmation screen will be displayed.
Press  or
or
 of the meter control
switches to select "Yes", and
then press
of the meter control
switches to select "Yes", and
then press  to delete the
selected charging schedule.
to delete the
selected charging schedule.
To cancel deletion of the registered
contents, select "No" and then
press  .
.
Setting "Charge Now" to on
The "Charge Now" setting can be changed by performing one of the two following procedures.
 or
or
 of the meter
control switches to select
"Charge Now", and then
press
of the meter
control switches to select
"Charge Now", and then
press  .
.
Each time is pressed, "Charge
Now" switches between on and off.
The "Closing Display" screen* will be displayed on the multi-information display.
(If the door is opened while waiting for charging schedule, the same screen will be displayed.)
*: If "Closing Display" is not set to
"Charging Schedule" on the  screen of the multi-information
display, the "Closing Display" is
not displayed. In this case, check
the settings on the multi-information
display.
screen of the multi-information
display, the "Closing Display" is
not displayed. In this case, check
the settings on the multi-information
display.
 to set "Charge
Now" to on.
to set "Charge
Now" to on.After setting operations are complete, charging starts when the AC charging connector is connected.
Displaying "Next Event"
 or
or
 of the meter
control switches to select
"Next Event", and then press
of the meter
control switches to select
"Next Event", and then press  .
.
The "Next Event" screen will be displayed.
When Charging Schedule Settings Are Canceled
Charging schedule settings are automatically canceled under certain conditions to ensure the safety and proper operation of your vehicle. For example, if you operate the power switch before confirming the settings, if the vehicle begins to start moving, or if a display message with higher priority appears, the charging schedule operation will be immediately canceled. These safety measures help prevent unintended charging and ensure that the system remains in a stable state.
When Charging Schedules Are Changed While Charging
If you modify the charging schedule during an active charging session, the system updates the “Next Event” to reflect your new settings. However, this change may cause the charging process to pause. To continue charging without disruption, simply activate the “Charge Now” feature after updating your schedule. Always verify that the updated “Next Event” meets your expectations so that your charging routine remains predictable and efficient.
NOTICE: While Performing the Setting Operation
While performing charging schedule setting operations-especially while the electric vehicle system is stopped-be careful not to discharge the 12-volt battery. Maintaining the proper battery level is critical, as a depleted 12-volt battery can compromise the operation and responsiveness of the vehicle’s electronic systems.
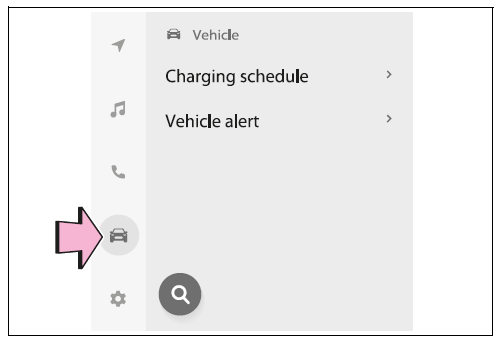
Setting Operations on Multimedia
All adjustments related to the charging schedule, such as setting start and stop times and selecting the appropriate charging mode, are managed through the “Charging Schedule” screen on your multimedia interface. This centralized approach makes it easy to tailor your charging sessions to your daily routine, helping you plan ahead and optimize your energy usage.
Leveraging a smart charging schedule not only offers enhanced convenience but also improves energy efficiency by aligning the charging process with off-peak electricity rates. By scheduling your AC charging sessions, you can avoid peak load times, reduce energy costs, and prolong the life of the traction battery. This innovative feature is one of many that advanced electric vehicles offer to support a sustainable and technologically savvy lifestyle. For instance, the Toyota bZ4X incorporates intelligent charging management that simplifies the charging process while ensuring optimal battery performance.
Displaying the "Charging Schedule" screen
It is not possible to control the Charging Schedule settings in Accessory Mode.
 and "Charging
Schedule", in that order. The
"Charging Schedule" screen
will be displayed.
and "Charging
Schedule", in that order. The
"Charging Schedule" screen
will be displayed.
How to read the "Charging Schedule" screen
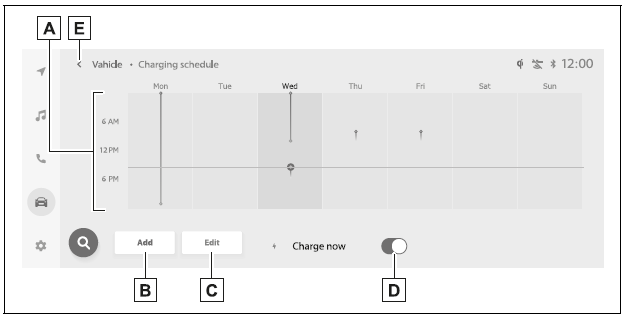
Displays the week-long registered charging schedule in a list using icons.
Press to add a new item to the charging schedule.
Press to change or delete registered items on the charging schedule.
Each time the button is pressed, "Charge Now" switches between on and off.
Press to close the "Charging Schedule" screen.
Registering the charging schedule
The "Add event" screen will be displayed on the screen.
Select the button in the row of the "Start at set time" or "Start and stop at set times".
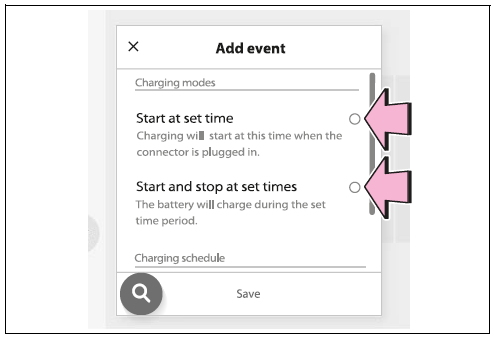

When the charging mode is "Start at set time", set the charging start time.
When the charging mode is "Start and stop at set times", also set the charging stop time.
Each time the day is selected, the repeated setting for the selected day switches between on and off.
When turned on, the check box is highlighted and the charging schedule is repeated on that day. It is possible to turn more than one day on.
The charging schedule is added to the list and an icon is added to the "Charging Schedule" screen.
 Using the Charging Schedule Function
 Switching Charging Schedules On and Off: A Step-by-Step Guide
During DC Charging
The current charging status can be monitored on the multi-information display, offering real-time insights into the process.
The actual time required for DC charging may differ from the duration shown on the DC charger, so slight variations in timing are normal.
Occasionally, you might exp ...
Windshield Wipers and Washer
The windshield wipers provide both automatic and manual operation, ensuring clear visibility in various weather conditions. The system allows you to switch between modes by operating the control lever, giving you flexibility based on driving circumstances.
Manual and Automatic Operation
...
