Toyota bZ4X Owner's Manual: If You Have a Flat Tire
Your vehicle is not equipped with a spare tire, but rather with an emergency tire puncture repair kit.
A puncture caused by a nail or screw passing through the tire tread can be temporarily repaired using this kit. It contains a bottle of sealant that is designed for one-time use, allowing you to mend one tire without removing the foreign object. However, depending on the extent of the damage, the repair kit may not always be effective.
After applying the temporary repair, have the tire professionally repaired or replaced by your Toyota dealer.
WARNING
If You Have a Flat Tire
Do not continue driving on a flat tire. Even short distances can cause irreparable damage to both the tire and wheel, which could ultimately lead to an accident.
Before Repairing the Vehicle
- Stop the vehicle in a safe location on a firm, flat surface.
- Engage the parking brake.
- Shift the transmission into Park (P).
- Turn off the EV system.
- Activate the emergency flashers.
- Examine the extent of the tire damage.
The emergency tire puncture repair kit is intended only for punctures caused by nails or screws penetrating the tire tread.
-
Do not remove the nail or screw from the tire before applying the repair kit; this could widen the hole and make a temporary fix impossible.
-
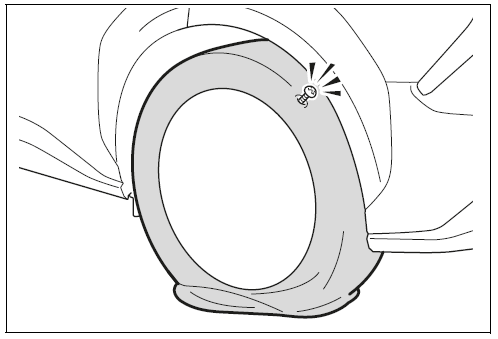
To help prevent sealant leakage, if you know the puncture’s location, try to position the tire so that the damaged area is at the top.
For example, owners of the Toyota bZ4X can use these steps to address a flat tire safely until a permanent repair is made.
A flat tire that cannot be
repaired with the emergency
tire puncture repair kit
In the following cases, the tire cannot
be repaired with the emergency tire puncture repair kit. Contact your
Toyota dealer.
- When the tire is damaged due to
driving without sufficient air pressure
- When there are any cracks or
damage at any location on the
tire, such as on the side wall,
except the tread
- When the tire is visibly separated
from the wheel
- When the cut or damage to the
tread is 0.16 in. (4 mm) long or
more
- When the wheel is damaged
- When two or more tires have been
punctured
- When more than one sharp
objects such as nails or screws
have passed through the tread on
a single tire
Location of the emergency tire puncture repair kit and tools

- Towing eyelet
- Emergency tire puncture repair kit
Emergency tire puncture repair kit components
Bottle
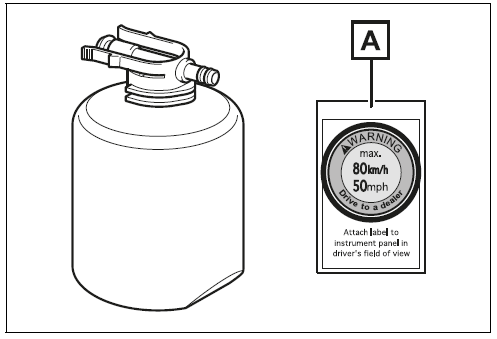
- Sticker
Compressor
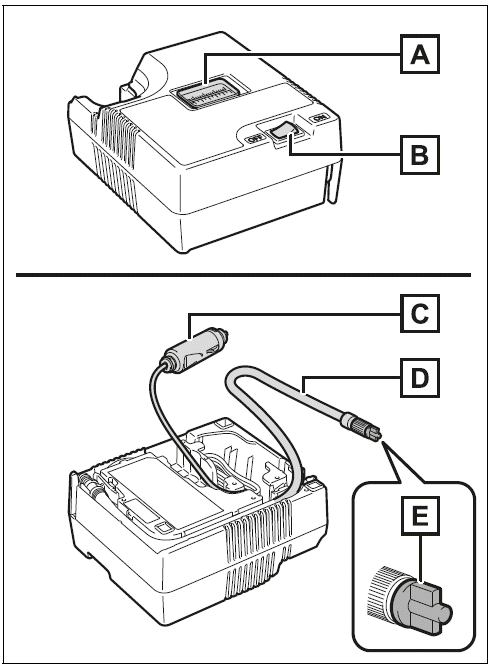
- Air pressure gauge
- Compressor switch
- Power plug
- Hose
- Air release cap
Emergency Tire Puncture Repair Kit
-
The sealant in the kit is designed for a one-time, temporary repair of a single tire. Once the sealant (or any part of the kit) has been used, contact your Toyota dealer for a replacement.
-
The included compressor is built for repeated use.
-
The sealant operates effectively within a temperature range of -40ºF (-40ºC) to 140ºF (60ºC).
-
This kit is specifically engineered for the tire size and type originally installed on your vehicle. Do not use it on tires that differ from the original specifications or for any other purposes.
-
Be aware that the sealant can stain clothing if it comes into contact; handle it carefully.
-
If the sealant spills onto a wheel or the vehicle’s body, wipe it off immediately with a wet cloth to prevent a permanent stain.
-
During operation, the repair kit may produce a loud noise; this is normal and does not indicate a malfunction.
-
Do not use the kit as a substitute for checking or adjusting tire pressure.
Important Notes on Checking the Repair Kit
-
Regularly verify the sealant’s expiry date, which is clearly marked on the bottle.
-
Do not use sealant that has passed its expiration date, as this may compromise the repair quality.
-
Since the sealant has a limited shelf life, be sure to replace it before the expiry date-if needed, consult your Toyota dealer for a new kit.
WARNING
If you have a flat tire
Do not drive on a flat tire. Even a short distance can damage both the tire and the wheel beyond repair, potentially creating a circumferential groove on the sidewall. In such cases, using the repair kit might lead to a tire explosion.
Cautions While Driving
-
Always store the repair kit securely in the luggage compartment. In the event of an accident or sudden braking, an unsecured kit could cause injury.
-
The repair kit is intended for use solely on your vehicle. Do not attempt to use it on another vehicle, as this could lead to an accident with potentially fatal or serious consequences.
-
Use the kit only on tires of the original size. Using it on tires with different dimensions or for any unintended purpose could result in an incomplete repair and create a hazardous situation.
Precautions for Using the Sealant
-
Ingesting the sealant is hazardous. If you accidentally ingest it, drink plenty of water immediately and consult a doctor.
-
If the sealant gets in your eyes or on your skin, rinse thoroughly with water. If irritation or discomfort persists, seek medical advice.
For example, owners of the Toyota bZ4X can rely on this kit for temporary repairs in an emergency, provided all instructions and safety precautions are followed and any used components are replaced by an authorized dealer.
Taking out the emergency tire puncture repair kit
- Open the deck board.
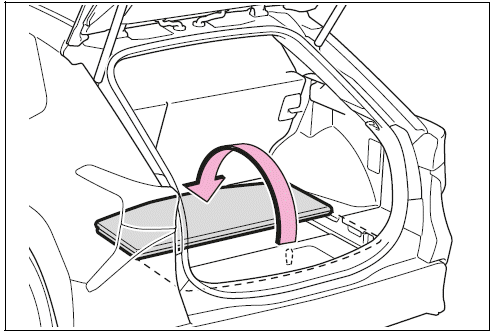
- Remove the cover.
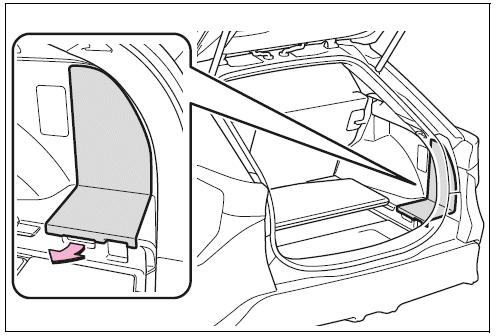
- Take out the emergency tire
puncture repair kit.
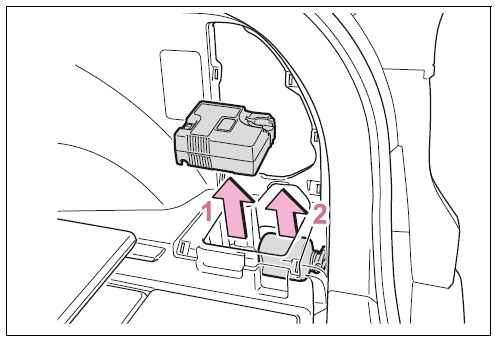
- Compressor
- Bottle
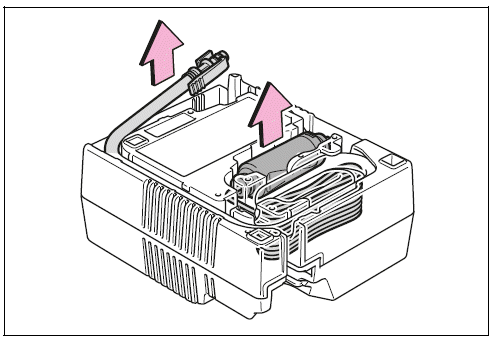
Emergency repair procedure
- Take out the repair kit from
the plastic bag.
Attach the sticker enclosed with the
bottle on the specified locations.
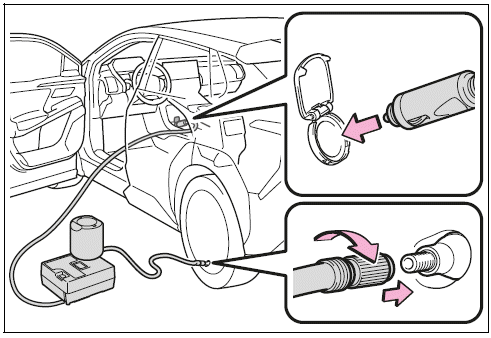
- Remove the hose and take
out the power plug from the
compressor.
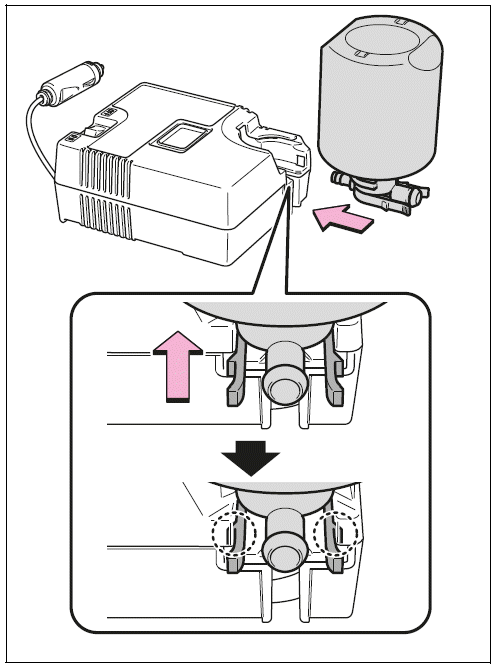
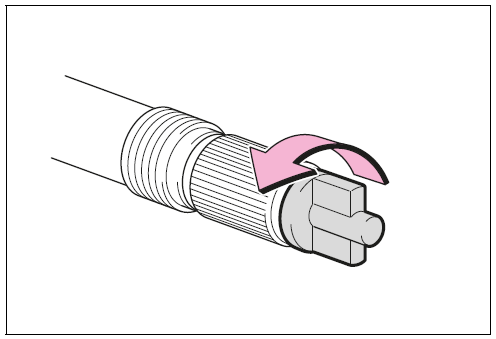
- Connect the bottle to the
compressor.
Insert and connect the bottle
straight into the compressor as
shown in the illustration, and check
that the claws of the bottle are concealed
in the holes.
- Connect the hose to the bottle.
As shown in the illustration, make
sure the hose is connected securely to the bottle.

- Remove the valve cap from
the valve of the punctured
tire.

- Extend the hose. Remove
the air release cap from the
hose.
You will use the air release cap
again. Therefore keep it in a safe place.
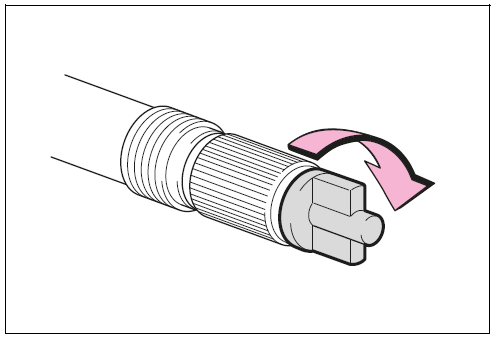
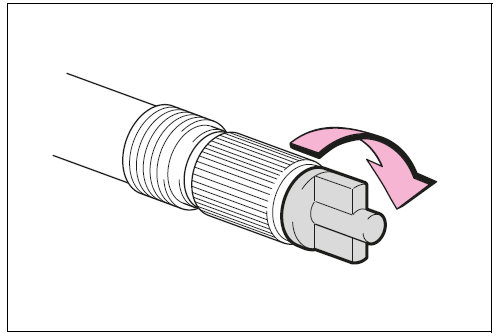
- Connect the hose to the
valve.
Screw the end of the hose clockwise
as far as possible.
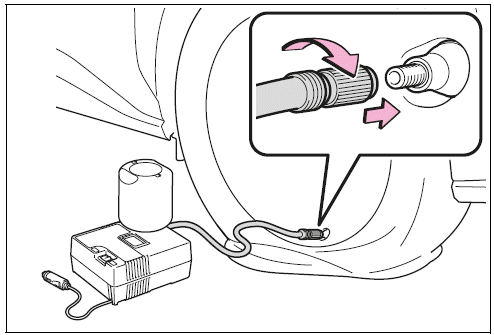
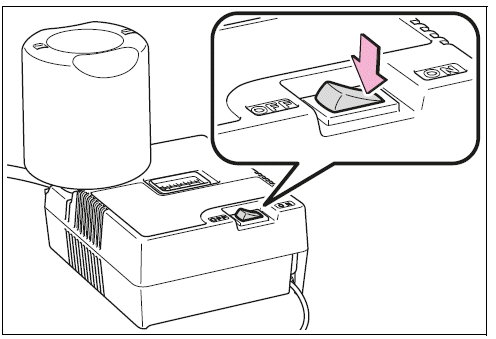
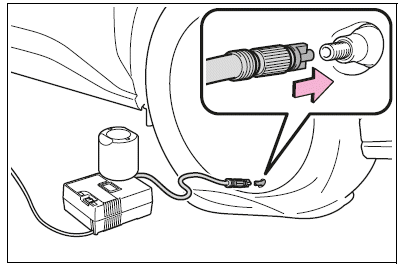
- Make sure that the compressor
switch is off.
- Connect the power plug to
the power outlet socket.
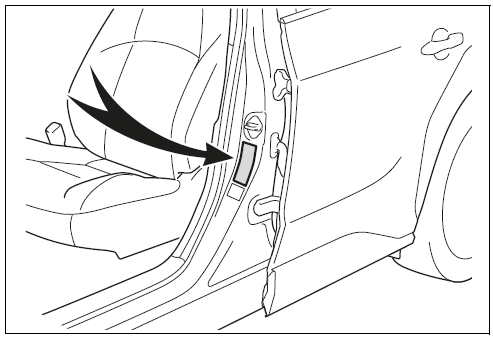
- Attach the sticker provided
with the tire puncture repair kit to a position easily seen
from the driver's seat.
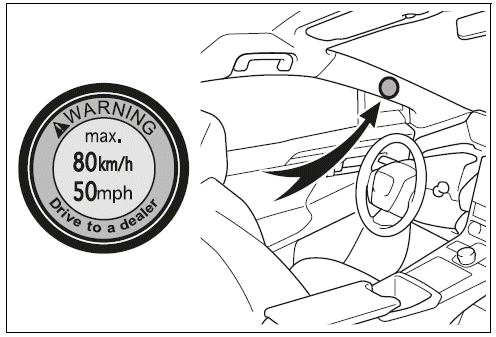
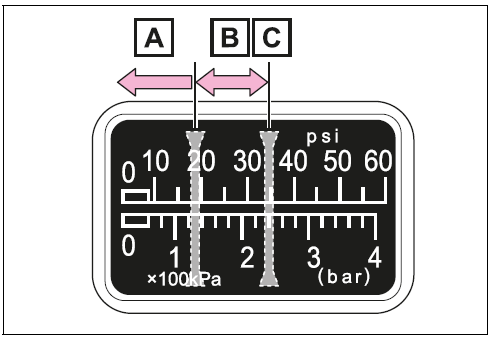
- Check the specified tire inflation
pressure.
Tire inflation pressure is specified
on the label as shown.
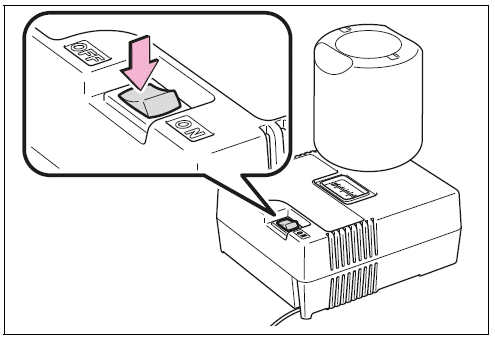
- Start the EV system.
- To inject the sealant and
inflate the tire, turn the compressor
switch on.
- Inflate the tire until the recommended
pressure is
reached.
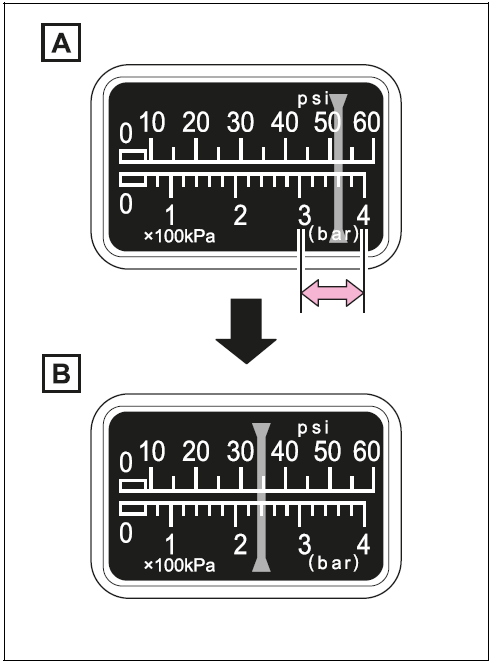
- The sealant will be injected
and the pressure will spike to
between 44 psi (300 kPa, 3.0
kgf/cm2 or bar) and 58 psi
(400 kPa, 4.0 kgf/cm2 or bar),
then gradually decrease.
- The air pressure gauge will
display the actual tire inflation
pressure about 1 to 5 minutes
after the switch is turned
on.
- Turn the compressor switch off
and then check the tire inflation
pressure. Being careful not to
over inflate, check and repeat the
inflation procedure until the specified
tire inflation pressure is
reached.
- The tire can be inflated for about
5 to 20 minutes (depending on the outside temperature). If the
tire inflation pressure is still lower
than the specified point after inflation
for 25 minutes, the tire is too
damaged to be repaired. Turn the
compressor switch off and contact
your Toyota dealer.
- If the tire inflation pressure
exceeds the specified air pressure,
let out some air to adjust the
tire inflation pressure.
- With the compressor switch
off, pull out the power plug
from the power outlet socket
and then disconnect the hose
from the valve on the tire.
Some sealant may leak when the
hose is removed.
- Install the valve cap onto the
valve of the emergency
repaired tire.
- Attach the air release cap to
the end of the hose.
If the air release cap is not
attached, the sealant may leak and
the vehicle may get dirty.
- Temporarily store the bottle
in the luggage compartment
while it is connected to the
compressor.
- To spread the liquid sealant
evenly within the tire, immediately drive safely for about
3 miles (5 km) below 50 mph
(80 km/h).
- After driving, stop your vehicle
in a safe place on a hard,
flat surface and reconnect
the repair kit.
Remove the air release cap from
the hose before reconnecting the
hose.
- Turn the compressor switch
on and wait for several seconds,
then turn it off. Check
the tire inflation pressure.
- If the tire inflation pressure is
under 19 psi (130 kPa, 1.3
kgf/cm2 or bar): The puncture
cannot be repaired. Contact
your Toyota dealer.
- If the tire inflation pressure is
19 psi (130 kPa, 1.3 kgf/cm2 or bar) or higher, but less
than the specified air pressure
- If the tire inflation pressure is
the specified air pressure
- Turn the compressor switch
on to inflate the tire until the
specified air pressure is
reached. Drive for about 3
miles (5 km)
- Attach the air release cap to
the end of the hose.
If the air release cap is not
attached, the sealant may leak and
the vehicle may get dirty.
- Store the bottle in the luggage
compartment while it is
connected to the compressor.
- Taking precautions to avoid
sudden braking, sudden
acceleration and sharp turns,
drive carefully at under 50
mph (80 km/h) to the nearest
Toyota dealer that is less
than 62 miles (100 km) away
for tire repair or replacement.
For repair and replacement of a tire
or disposal of the tire puncture
repair kit, contact your Toyota
dealer.
When having the tire repaired or
replaced, make sure to tell the Toyota
dealer that the sealant is
injected.
If the tire is inflated to more than the specified air pressure
- Disconnect the hose from the
valve.
- Install the air release cap to the
end of the hose and push the
protrusion on the air release cap
into the valve to let some air out.
- Disconnect the hose from the
valve, remove the air release cap
from the hose and then reconnect
the hose.
- Turn the compressor switch on
and wait for several seconds,
then turn it off. Check that the air
pressure indicator shows the
specified air pressure is reached.
If the air pressure is under the
designated pressure, turn the
compressor switch on again and
repeat the inflation procedure
until the specified air pressure is
reached.
After a Tire is Repaired with the Emergency Tire Puncture Repair Kit
-
Immediately replace the tire pressure warning valve and its transmitter, as the repair process may compromise their functionality.
-
Even when the tire inflation pressure is adjusted to the correct level, the tire pressure warning light might still flash or remain illuminated.
WARNING
When Fixing a Flat Tire
-
Park your vehicle in a secure, flat area to ensure a safe working environment.
-
Avoid touching the wheels or areas surrounding the brakes immediately after driving because they can be extremely hot and may cause burns.
-
Ensure that the valve and hose are connected securely while the tire remains mounted on the vehicle.
If the hose is not firmly attached to the valve, air leakage might occur, causing the sealant to be expelled unexpectedly.
-
Should the hose detach during inflation, the sudden release of air pressure can force it to jerk violently.
-
Once tire inflation is complete, disconnecting the hose or releasing a small amount of air might cause the sealant to splatter.
-
It is crucial to follow the recommended operating procedure precisely; failure to do so might result in uncontrolled discharge of the sealant.
WARNING
Maintain a Safe Distance During Repair
Stay back from the tire while the repair is in progress, as there is a risk the tire could burst during the operation. If you notice any cracks or deformations, immediately shut off the compressor and cease repairs.
-
The repair kit’s compressor should not be run continuously for more than 40 minutes to prevent overheating.
-
Some components, such as the metal connector between the sealant bottle and compressor, will become extremely hot during use. Handle these parts with extreme caution.
-
Ensure that any vehicle speed warning sticker is adhered only to its designated location. Misplacement-especially near sensitive areas like an SRS airbag module-can interfere with safety systems.
Driving to Evenly Distribute the Sealant
After the repair, drive at a low speed to help distribute the liquid sealant uniformly across the tire. Exercise extra care when turning or cornering to maintain control and avoid sudden maneuvers.
-
If the vehicle does not maintain a straight trajectory, or you detect unusual pulling through the steering wheel, stop immediately and assess the tire.
-
Inspect the tire for signs of separation or detachment from the wheel.
-
Check the tire inflation pressure. If the pressure has dropped to 19 psi (130 kPa, approximately 1.3 bar) or below, the tire might have sustained severe damage.
NOTICE
When Performing an Emergency Repair
-
Do not remove the nail or screw that caused the puncture. Keeping the object in place is essential for the effectiveness of the temporary repair.
-
The repair kit is not waterproof. Avoid using the kit in rainy conditions or any situation where it might become wet.
-
Do not place the repair kit directly on dusty surfaces, such as sand at the roadside, as dust accumulation can impair its functionality.
-
Always keep the sealant bottle in an upright (vertical) position during operation. The kit will not function properly if the bottle is laid horizontally.
Precautions for the Emergency Tire Puncture Repair Kit
-
Use only the recommended 12 V DC power supply that is intended for vehicle use. Connecting the kit to any other power source may cause malfunction.
NOTICE
-
Always store the repair kit in a clean, protected area to prevent exposure to dirt or water.
-
Place the repair kit in the vehicle’s luggage compartment, out of reach of children.
-
Do not disassemble or modify any components of the repair kit. Impacting or tampering with parts such as the air pressure indicator might lead to a malfunction.
To Avoid Damage to the Tire Pressure Warning Valve and Transmitter
When a tire is repaired with liquid sealants, its associated tire pressure warning valve and transmitter may not operate as expected. If a liquid sealant is used, have your vehicle inspected by a qualified service shop or your dealer as soon as possible and replace these components during the tire repair or replacement process.
For example, owners of the Toyota bZ4X should follow these comprehensive guidelines to ensure that temporary puncture repairs do not compromise safety or damage the integral systems designed to monitor tire pressure.
The multi-information display alerts you to system malfunctions, improper operations, or maintenance needs. When a warning appears, immediately follow the corrective steps specified. If the warnin ...
The reasons for an inoperative EV system vary, so it is essential to check each possibility and perform the corresponding procedure.
The EV system will not start despite following ...
Other articles:
When Charging Cannot Be Carried Out
If charging does not start despite following the proper procedure, it is essential to verify all system indicators and settings. Begin by reviewing any messages that appear on the multi-information display, as these alerts can offer valuable clues about the underlying issue.
When charging f ...
Child safety
Ensuring the safety of young passengers in your Toyota bZ4X is essential for every responsible driver. Properly securing children during travel significantly reduces the risk of injury in case of sudden stops or collisions. Our guidelines in Riding with Children in Your Toyota bZ4X offer clear and p ...
 If a Warning Message is Displayed
 If the EV System Will Not Start