DC charging is engineered for rapid energy replenishment, making it a crucial feature for today's fast-paced, eco-conscious driving environment. This method of charging not only reduces downtime but also integrates advanced battery management to optimize performance. For instance, innovative electric vehicles such as the Toyota bZ4X utilize state-of-the-art DC charging technology that balances speed with battery longevity, ensuring you spend less time waiting and more time on the road.
By understanding these key points and following best practices, you can maximize the efficiency of your DC charging sessions while safeguarding the health of your traction battery. Whether you’re planning a long trip or needing a quick top-up during your day, proper use of DC charging technology is essential for maintaining vehicle performance and reliability.
How to set the DC charging power
You can change the DC charging power limit on the multi-information display or multimedia.
 or
or
 of the meter
control switches to select
of the meter
control switches to select  .
.
 or
or
 of the meter
control switches to select "VehiVehicle
Settings", and then press and
hold .
of the meter
control switches to select "VehiVehicle
Settings", and then press and
hold .
Press  or
or
 of the meter
control switches to select
"Charging Settings", and then
press
of the meter
control switches to select
"Charging Settings", and then
press  .
.
 or
or of the meter
control switches to select "DC
charging power", and then press
of the meter
control switches to select "DC
charging power", and then press  .
.The "DC charging power" screen will be displayed.
or
of the meter
control switches to select the
charging power from "MAX",
"125kW", "100kW", "75kW",
"50kW" and then press .
The maximum power when charging is limited to the selected power or less.
If "MAX" is selected, the vehicle will be charged with the maximum power that can be charged.
 .
.The maximum power when charging is limited to the selected power or less.
If "MAX" is selected, the vehicle will be charged with the maximum power that can be charged.
Changing the "Charging Limit" Settings
If "Check Charging System Close Charging Port Lid See Owner's Manual" is displayed on the multi-information display
When the system check following DC charging does not complete successfully, the EV system will not start-even if the power switch is pressed while the brake pedal is depressed. This safeguard ensures that all charging parameters have been verified before the vehicle can be driven.
To perform a proper system check, follow these procedures:
Do not open the charging port lid while the system check is in progress; once complete, the power switch will automatically turn off.
If the error message remains on the multi-information display after the system check is completed, contact your Toyota dealer for further assistance.
WARNING
Warnings for DC Charging
Be sure to observe the following guidelines when using DC charging. Failure to do so may cause an accident that could lead to death or serious injury.
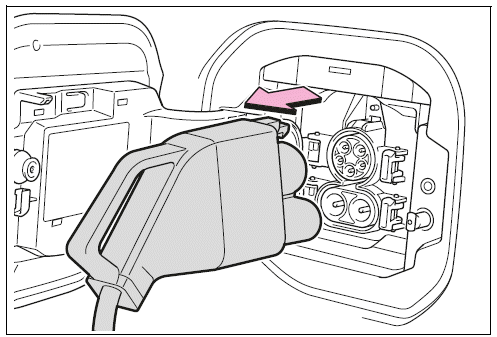
When Connecting the DC Charging Connector
After charging is completed, always remove the DC charging connector from the DC charging inlet before starting the EV system. Starting the vehicle with the connector still attached could lead to an accident, possibly resulting in death or serious injury.
Observing these precautions ensures a safe and efficient DC charging process, protecting both the user and the integrity of the charging system.
NOTICE
When Using DC Charging
For safe and effective DC charging, always adhere strictly to the handling procedures provided by the DC charger manufacturer. Failure to follow these guidelines can result in damage to both the DC charger and the vehicle's electrical system.
Modern electric vehicles, such as the Toyota bZ4X, are equipped with advanced DC charging systems designed for rapid energy replenishment while maintaining stringent safety standards. Correctly implementing these procedures not only ensures a secure charging process but also helps safeguard battery performance and longevity.
Always inspect your equipment for any signs of wear or damage before each use, and consult the manufacturer's instructions for any specific handling recommendations. This diligent approach will enhance overall safety and optimize your vehicle's charging efficiency.
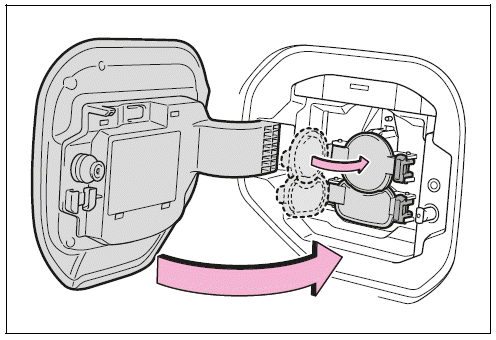
After charging
DC charging connector will be unlocked automatically when charging is completed.
The DC charging connector shape and treatment will differ depending on the type of DC charger. Perform the operations in accordance to handling procedures of the DC charger.
Return the removed DC charging connector to its original position.
When DC Charging Cannot Be Stopped
If the DC charging session does not stop through the standard controls of the charger-possibly due to a malfunction or system error-you have alternative methods to terminate the process safely. One effective solution is to use the door unlock button on your wireless remote or the button located near the driver's seat. These controls are designed to override the charging sequence in emergencies.
Another method to force a stop is by pressing the door unlock switch three times at approximately one-second intervals. This multi-press command triggers a safety protocol that ensures the DC charging is halted even when conventional methods fail.
If the DC Charging Connector Cannot Be Unlocked
In cases where the DC charging connector remains locked despite using the override methods, it is critical to follow the proper procedures to avoid causing damage. First, verify that the charging cycle is complete, and then try the door unlock commands again. If the connector still does not release, contact an authorized service technician immediately for inspection and repair.
After DC Charging
After a DC charging session, you might notice that the charge level displayed on the DC charger is lower than expected-even though the traction battery has reached its upper limit. This discrepancy is typically due to the calibration processes within the battery management system, which adjust the displayed figures to optimize long-term battery health.
NOTICE
Caution After DC Charging
By following these guidelines, you ensure that your DC charging process remains safe and efficient. Adhering to these procedures not only safeguards the integrity of the charging system but also enhances battery longevity. Advanced electric vehicles, such as the Toyota bZ4X, are equipped with state-of-the-art DC charging systems that emphasize both performance and safety, providing a reliable and secure charging experience.
 How to Use DC Charging
 Using the Charging Schedule Function
Windshield Wipers and Washer
The windshield wipers provide both automatic and manual operation, ensuring clear visibility in various weather conditions. The system allows you to switch between modes by operating the control lever, giving you flexibility based on driving circumstances.
Manual and Automatic Operation
...
Ensuring Safe Driving Conditions
Before driving, confirm the floor mat is properly secured with all retaining hooks in place.
Press each pedal fully to ensure there is no interference with the floor mat.
By following these precautions, you ensure the safe operation of your Toyota bZ4X and minimize the
risk of accidents ...
